How Do You Post A Buy Ad With BitNasdaq App?
A k Trader official
Updated at: 4 months ago
Posting a Buy Ad on BitNasdaq P2P is a straightforward process that allows you to connect with sellers and make secure trades. Follow this detailed step-by-step guide to create your buy ad and start trading today.
Step 1: Log in to Your BitNasdaq Account
Open the BitNasdaq app on your mobile device and enter your login credentials. Make sure you have a stable internet connection and access to your security authentication if required. Once logged in, you will be directed to the homepage.
Step 2: Navigate to P2P Trading
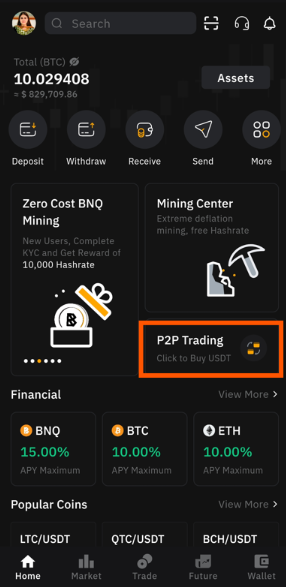
On the homepage, locate and tap the P2P Trading option. This will take you to the peer-to-peer trading section. Inside the P2P module, find and tap the Ads tab, where you can manage or create new advertisements for buying and selling assets.
Step 3: Create a New Ad
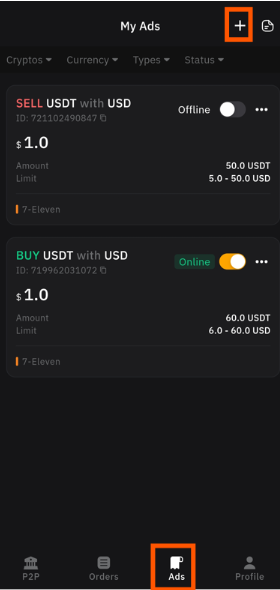
In the Ads tab, look for the Add (+) symbol in the top-right corner of the screen. Tapping this button will open the ad creation interface, where you can customize the details of your buy ad according to your trading preferences.
Step 4: Select 'Buy'
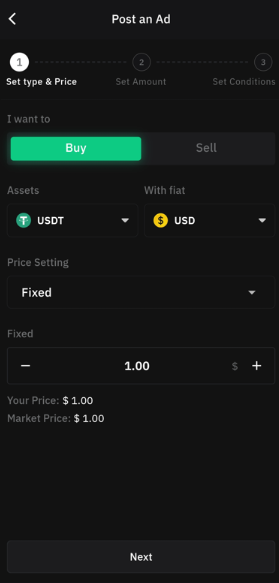
After tapping the (+) symbol, select Buy to create an ad for purchasing assets. This ensures that your advertisement is visible to sellers who are looking to trade with buyers like you.
Step 5: Choose Asset and Currency
Select the specific cryptocurrency or digital asset you wish to purchase. Then, choose the fiat currency you will use for the transaction. Make sure to pick the correct pairing based on your preferred trading method and local availability.
Step 6: Set Price Type
Decide whether you want your buy price to be Fixed or Floating. A Fixed Price remains constant, meaning you will always buy at the set rate. A Floating Price adjusts based on market fluctuations, allowing for more dynamic pricing.
Step 7: Set Your Buy Price
If you chose a fixed price, enter the amount at which you want to purchase the asset. Be mindful of market conditions and competitive rates. If you selected a floating price, ensure that it aligns with current market trends. Once done, tap Next to proceed.
Step 8: Enter the Amount
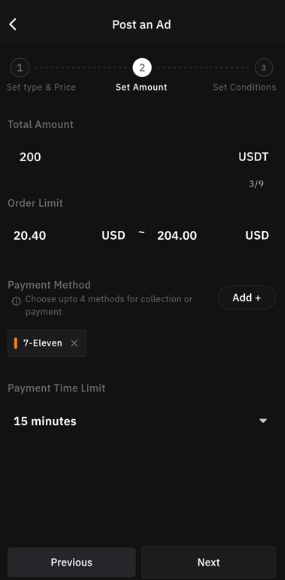
Now, specify the total quantity of the asset you wish to buy. This will determine how much of the selected cryptocurrency you are willing to purchase through the ad.
Step 9: Configure Order Limits
Set the minimum and maximum order limits for sellers. This helps filter out transactions that do not meet your buying criteria. Additionally, add your preferred payment method, which sellers will use to receive payments from you.
Step 10: Set Payment Time Limit
Determine the maximum time frame within which a seller must complete the payment process. A shorter time frame encourages quick transactions, while a longer one provides flexibility. Tap Next to continue.
Step 11: Add Trade Requirements
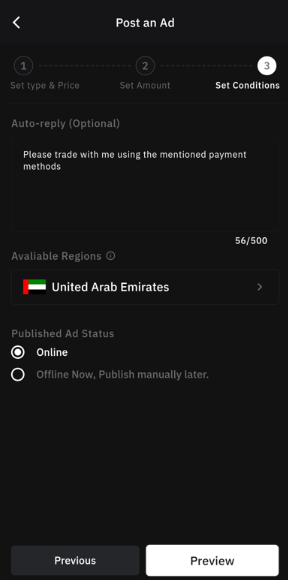
Here, you can add any special conditions that sellers must meet before they can trade with you. For example, you might require verified accounts or traders with a specific transaction history, or any other message you might want to leave for the trader.
Step 12: Select Region
Choose the region where you want your buy ad to be visible. This ensures that your advertisement reaches the right audience based on your trading preferences and local regulations.
Step 13: Set Ad Status
Decide whether to make your ad Online immediately so that sellers can start viewing and interacting with it, or set it as Offline if you want to save it for later.
Step 14: Preview and Agree
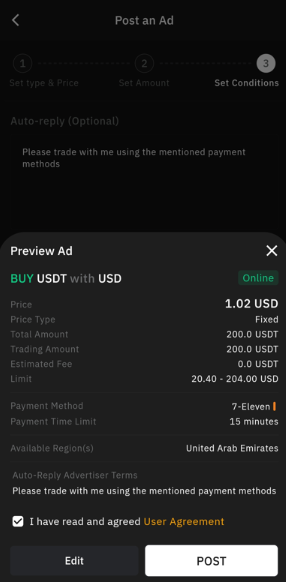
Tap Preview to review all the details of your buy ad. Carefully check the asset, price, payment methods, and any additional conditions. If everything looks good, checkmark the agreement box to confirm your acceptance of the platform's terms.
Step 15: Post Your Buy Ad
Once you have verified all details, tap Post to publish your buy ad. This will make your ad live and visible to sellers who meet your criteria.
Step 16: Your Buy Ad is Now Live!
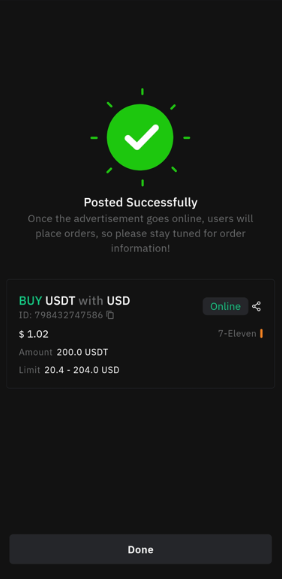
Congratulations! Your buy ad is now active, and you're ready to start receiving trade requests from sellers on BitNasdaq P2P. Keep an eye on your ad's performance and adjust details if needed.
Happy Trading!
Enjoy smooth and secure P2P transactions on BitNasdaq! Keep an eye on your active ads, monitor the market, and engage in secure trading for the best experience.